You take a card, rub it against the table, and it vanishes. No complicated sleight of hand. No knuckle-busting technique. The Rub a Dub Vanish is one of those rare moves that looks like pure magic but relies almost entirely on one thing: timing.
This is not a standalone trick. It is a utility move you throw into a larger routine to make a moment more visual or more magical. And it has been doing exactly that for over a century.
Here is a full breakdown of the move’s history, its handling, and a few tips to help you avoid common mistakes.
Table of Contents
- Where the Rub a Dub Vanish Came From
- What Is the Rub a Dub Vanish?
- Setting Up the Card
- The Swivel (Practice This First)
- The Full Move
- Tip 1: Use a Half Wrist Kill
- Tip 2: Slow Down
- Tip 3: Close the Windows
- Practice and Timing
Where the Rub a Dub Vanish Came From
The Rub a Dub Vanish has deeper roots than most magicians realize. The earliest known version dates back to 1909, when Harry Louine described a face-up card vanish in The Sphinx. His handling was different from what we use today. Instead of rubbing the card onto a surface, Louine pushed the card off the deck under cover of his right hand and pulled it back beneath the deck with his left fingertips.
In 1925, Paul Stadleman published a face-down version in The Magical Bulletin. This was closer to the modern move, but Stadleman still pushed the card into the right palm rather than onto a table.
The idea of pushing the card onto a surface for the vanish first showed up in print in 1938, inside William H. McCaffrey’s “Card in the Pocket II” in Greater Magic. McCaffrey used it as a way to make a card appear to penetrate through the magician’s trousers and into a pocket.
Around the same period, Jean Hugard reported that Paul LePaul was performing the vanish on his thigh as early as 1928.
The move got its name in 1940 when Hugard and Frederick Braue included it in Expert Card Technique as part of a trick called “Rub-A-Dub-Dub.” The trick title eventually migrated to the sleight itself.
Ed Marlo is often credited as the creator because he included the technique in Off the Top in 1945 under the names “Rub Away” and “Rub-Away-Mag.” But based on the published record, the move existed decades before Marlo put it in print.
So the next time you rub a card into a table and watch someone’s jaw drop, you are performing a piece of card magic history that has been refined by magicians for over a hundred years.
The Set Up

Start with the card angled slightly off the top of the deck, jogged to the side at a slight diagonal. Some people prefer a straight side jog, but angling the card allows for a cleaner swivel action when you square it later.
Your left thumb clamps down on the top left corner of the card. Your first finger wraps around the front edge of the deck, making contact with both the card and the deck itself. If the card is not secure in this position, the squaring action will be sloppy.
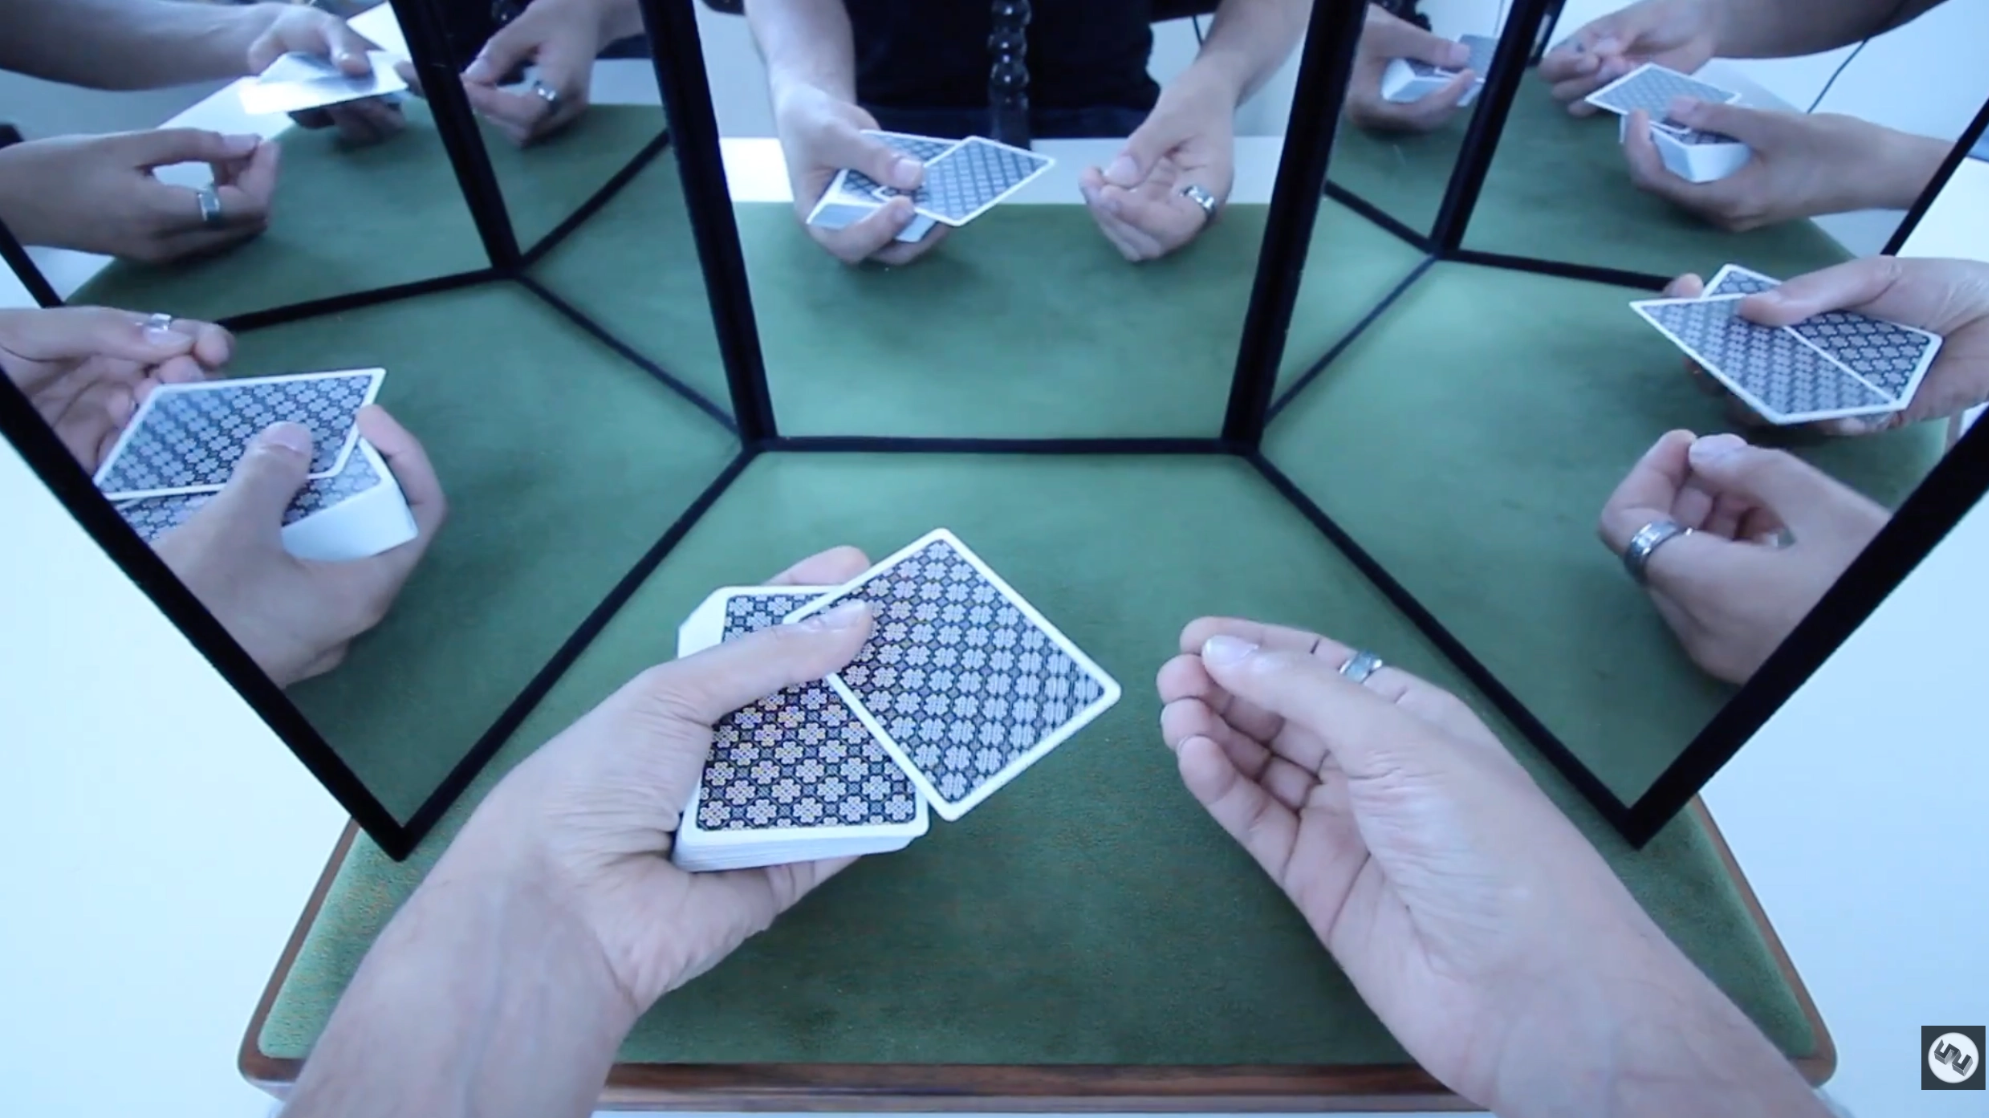
The Swivel (Practice This First)

Before you bring your right hand into the picture, practice this part on its own.
From the angled position, pull inward with your left thumb. The card will swivel and end up flush with the top of the deck. Your first finger helps guide the card so it stays square. The goal is a perfectly squared card in one quick, smooth motion.
Drill this over and over. Go from the angled position to perfectly square until it feels automatic. This is the core mechanic of the entire move.
The Full Move
Once the swivel feels natural, here is how everything comes together.
Your right hand comes over the deck, moves past the card, and starts traveling downward toward the table. Right about the midpoint of that downward motion is when you start the swivel with your left hand.
As your right hand lands flat on the table, the card should already be squared on top of the deck. Your right hand then rubs the table surface as if the card is underneath, slowly dissolving it away.
All your attention should be on your right hand and the table. Look at where the card supposedly is. Your left hand with the deck should be cold. No one should be thinking about it. Then do whatever magical gesture you like to reveal the card is gone.
Tip 1: Use a Half Wrist Kill

As you do the squaring action with your left hand, add a slight wrist turn so the deck tilts toward palm-down. Not a full wrist kill, just about halfway.
This shades the top of the deck. If your timing is slightly off or the card is not perfectly squared, the angle hides it. Without this tilt, the top of the deck faces the ceiling and any misalignment is obvious.
Tip 2: Slow Down
One of the most common beginner mistakes is trying to compensate for bad timing with speed. The move ends up looking rushed and awkward, which actually draws more attention to the deck.
Work on the timing until you can do the entire move slowly and relaxed. A smooth, casual motion looks far more magical than a sudden snap.
Tip 3: Close the Windows

When your right hand rubs the table, make sure there are no gaps between your fingers. If someone can see through your hand to the table surface, they will notice the card was never there.
Keep your fingers together naturally. And here is the real key: believe the card is under your hand. If you act like it is there, your audience is more likely to believe it too. Sell the moment before the reveal.
Practice and Timing
This move lives or dies on timing. Practice in front of a mirror or record yourself on camera. That is the only reliable way to check whether the squaring action is invisible from the front.
Start by drilling the one-handed swivel until it is smooth and consistent. Then add the right hand motion. Then put it all together at a slow, relaxed pace. Speed up only after the timing feels natural.
The Rub a Dub Vanish takes minutes to learn but rewards you every time you use it. Once the timing clicks, you have a clean, visual vanish that fits into almost any card magic performance. And now you know you are carrying on a technique magicians have been refining since 1909.